Building a GitOps pipeline pt. 1
This is going to be a series of posts about a learning journey on what it takes to build a GitOps pipeline, with the added constraint that I’m going to be self-hosting all of the necessary parts to achieve this. On one hand, it’s bound to be a great exercise to put together disjointed pieces of knowledge I already had; and on the other, it serves as a way to document the journey for people that might be interested in knowing how such a thing is possible.
So, let’s get started!
The Foundation#
I start this journey by cheating a little: I already had a Gitea instance running. Now, this is hardly the most challenging part of this journey, as the set-up of Gitea is relatively straight-forward. The reason why I chose Gitea is due to the fact that it’s a FOSS project with built-in Actions support that are mostly compatible with Github Actions: this will make the iteration process faster, as there’s a lot more documentation available about GHAs, and the fact that it’s tightly integrated with the forge. There’s also the added benefit that a container registry available, which is important in several situations.
This is the first piece of the puzzle. The other is a demo app that I built in Go for this purpose, and allows me to demonstrate several principles that are essential in a CI/CD framework. Go makes it easy to make testing and vetting first class citizens of this process, as well as easily expose endpoints that will become fundamental later on.
The App#
You can see the full source code of the app here. Of note, we expose two endpoints that just return very simple information:
func healthHandler(w http.ResponseWriter, r *http.Request) {
    json.NewEncoder(w).Encode(map[string]any{
        "status":    "healthy",
        "timestamp": time.Now().Unix(),
    })
}

func readinessHandler(w http.ResponseWriter, r *http.Request) {
    if !probeState.ready.Load() {
        http.Error(w, `{"error": "Readiness probe failed"}`, http.StatusInternalServerError)
        return
    }
    json.NewEncoder(w).Encode(map[string]string{"status": "ready"})
}
Of note, there’s the fact that we can build this with just Go’s standard library. As it is, there’s no external dependencies, which is something I like a lot about Go for mocking these simple apps. This pattern repeats once we have get to the testing: we can query the endpoint with nothing but the standard library:
func TestHealthHandler(t *testing.T) {
    req := httptest.NewRequest("GET", "/health", nil)
    w := httptest.NewRecorder()

    healthHandler(w, req)

    if w.Code != http.StatusOK {
        t.Errorf("Expected status 200, got %d", w.Code)
    }

    if w.Body.String() == "" {
        t.Error("Expected non-empty response body")
    }
}
With this out of the way, we can start to build the pipeline.
The Pipeline#
There’s two parts here: the Dockerfile, and the workflow for the CI action. Starting with the first, it’s again a simple set of instructions to build our app. The only thing of note here is the choice of the alpine images, as they provide a minimal starting point which reduces the bloat included in the process.
FROM golang:1.25-alpine AS builder

WORKDIR /app

COPY go.mod ./
RUN go mod download

COPY *.go ./
RUN go build -o gitops-demo .

FROM alpine:latest

RUN addgroup -g 1000 gitops && adduser -D -u 100 -G gitops gitops

WORKDIR /app

COPY --from=builder /app/gitops-demo .
RUN chown -R gitops:gitops /app

USER gitops

EXPOSE 8080

CMD ["./gitops-demo"]
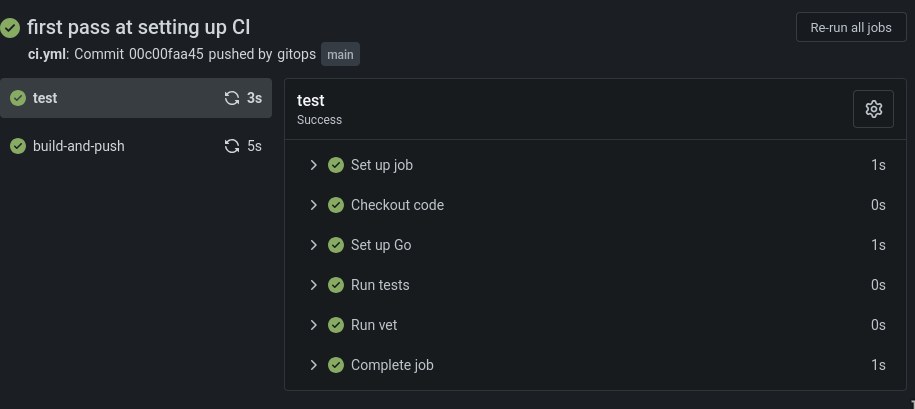
As for the workflow, it’s slightly more complex, but only because we’re doing much more: first, we setup the testing phase, which is fundamental to guarantee that no code gets integrated that doesn’t pass our testing suite. You should still run the tests locally, but this adds a safety layer to the project. Once the testing phase passes, we go to the building phase: we build the binary, and we build and push the Docker images to the container registry that Gitea makes available - you can find the latest images here.
name: CI

on:
  push:
    branches: [main]

env:
  REGISTRY_HOST: git.assilvestrar.club

jobs:
  test:
    runs-on: self-hosted
    steps:
    - name: Checkout code
      uses: actions/checkout@v4

    - name: Set up Go
      uses: actions/setup-go@v4
      with:
        go-version: '1.24'

    - name: Run tests
      run: go test -v ./...

    - name: Run vet
      run: go vet ./...

  build-and-push:
    needs: test
    runs-on: self-hosted
    if: github.ref == 'refs/heads/main'
    steps:
    - uses: actions/checkout@v4

    - name: Set up Go
      uses: actions/setup-go@v4
      with:
        go-version: '1.24'

    - name: Build binary
      run: go build -v ./...

    - name: Build and push Docker image
      run: |
        docker build -t ${REGISTRY_HOST}/${{ secrets.REGISTRY_USER }}/gitops-demo-app:${{ github.sha }} .
        docker tag ${REGISTRY_HOST}/${{ secrets.REGISTRY_USER }}/gitops-demo-app:${{ github.sha }} ${REGISTRY_HOST}/${{ secrets.REGISTRY_USER }}/gitops-demo-app:latest
        echo ${{ secrets.REGISTRY_PASS }} | docker login ${REGISTRY_HOST} -u ${{ secrets.REGISTRY_USER }} --password-stdin
        docker push ${REGISTRY_HOST}/${{ secrets.REGISTRY_USER }}/gitops-demo-app:${{ github.sha }}
        docker push ${REGISTRY_HOST}/${{ secrets.REGISTRY_USER }}/gitops-demo-app:latest
      working-directory: .
Of note, there’s the secrets.REGISTRY_USER and secrets.REGISTRY_PASS variables. These are secrets that are hosted on Gitea, which adds a layer of security to this workflow: this way, we’re not exposing credentials online, and I don’t need to tell you how important this is.
Now we have all the pieces we need! We push all this to our Gitea repository, et voilà! Is there a prettier sight than all these green check marks?
What’s next#
Now that we have a very simple CI pipeline established, we can start to expand it with some other niceties. The fact that the endpoints I started with are called health and ready should offer some clues. But, first, we will start by making this infrastructure a bit more realistic for real-life scenarios. Stay tuned for more!